

Cloud collaboration in DaVinci Resolve 20 is finally mature enough to be trusted in professional workflows. For directors, DPs, and post-house leads who manage the creative and client relationships, it offers a powerful way to share timelines with remote editors or colorists—without the chaos of relinking nightmares or giant file transfers gone wrong.
This guide walks through how to set up a reliable Resolve Cloud Project, assuming you—the project owner—hold the master media and project files, while your collaborators connect remotely to work on the same timeline. We’ll also break down how the footage, proxies, and databases interact, what to avoid, and when it is worth sending that hard drive in the mail.
Part One: How the Project Owner Sets Things Up
1. The Philosophy: Control the Folder Structure, Control the Chaos
At BRAEID, we follow a simple rule: the person who owns the raw media owns the folder structure.
It’s tempting to let every freelancer organize their drives however they please, but that’s the root of 90% of offline-media headaches. You must establish a master structure and replicate it—pixel for pixel—across all collaborators.
Start by creating a clean master folder following a schema like what we outlined in our Standardized Operating Procedure article.
Here’s an adapted version tailored for Resolve Cloud work:
00_PROJECTS/
01_MEDIA/
  Audio/
    Music/
    SFX/
    VO/
  Images/
    Graphics/
    Photos/
  Video/
02_EXPORTS/
  Final/
  Rough/
03_DOCS/
In Resolve, you’ll only need bins for edit assets—Audio, Images, and Video. There’s no need to create bins for 02_EXPORTS or 03_DOCS, since those folders contain deliverables and production notes rather than editable media.
2. Building the Cloud Project
Create a Blackmagic Cloud Project Library.
Invite your collaborators via their Blackmagic IDs.
Create your new project inside that shared library. The cloud library handles all the metadata—timelines, bins, and locks—while your actual footage remains on local storage.
Enable multi-user collaboration so Resolve manages locks automatically. This prevents timeline overwrites and lets you see who’s active in real time.
3. Proxy Setup and Placement
Proxies are your friend, but only when they live in the right place.
In Project Settings → Optimized Media and Render Cache (Proxy Media), define your preferred codec and resolution.
Never let Resolve bury proxies in its default cache directory. Instead, in In Preferences → Media Storage make sure the proxy subfolders in media file location bubble is checked for the Proxy Generation Location. See screenshot

Preferred Proxy Creation Settings
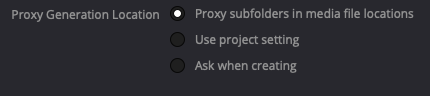
Proxy Generation Location
This keeps everything self-contained and ensures your proxies sync properly across systems. Resolve will handle linking proxies and originals automatically, as long as file names remain unchanged. There’s no need to rename proxies or originals—just keep them as generated.

Part Two: Sync Strategies (and Who Sets What)
When you enable Blackmagic Cloud Storage, you’ll be prompted to choose what to sync: proxies only, proxies and originals, or no sync at all. Your choice, and your collaborator’s choice, determine how media flows between systems. Below are the four most common strategies, each clarifying what you (the project owner) should select and what your collaborator should select when opening the project for the first time.
Strategy A — Sync Proxies Only (recommended for remote editors)
Your role (owner): Select “Sync Proxies Only.” This uploads all generated proxies to the Blackmagic Cloud so your editor can work with them, while your RAW camera files stay safely on your drive.
Collaborator’s role (editor): When opening the project for the first time, select “Sync Proxies and Originals.” This ensures that any new files they add—music, graphics, stock clips—are synced to the Blackmagic Cloud in their original form, which then sync back down to your local folder structure automatically.
Result: You retain the master media. The editor works with lightweight proxies, and any new original assets they add land in the correct place within your shared folder tree.
Strategy B — Sync Proxies + Select Originals (hybrid workflow)
Your role (owner): Start with “Sync Proxies Only.” Later, selectively promote certain media (such as color-critical shots or inserts) to sync their originals by toggling “Sync Originals” in the Cloud Media settings.
Collaborator’s role (editor): Always choose “Sync Proxies and Originals.” That way, if they add or adjust original files, those are synced properly, and when you push specific originals, they download automatically on their side.
Result: You minimize bandwidth by syncing only critical originals, while maintaining perfect structural consistency.
Strategy C — Sync Proxies + All Originals (for colorists or finishing partners)
Your role (owner): Select “Sync Proxies and Originals.” This uploads both the proxies and the full RAW media to Blackmagic Cloud, ensuring your colorist has access to everything.
Collaborator’s role (colorist): Select “Sync Proxies and Originals.” They will have both proxy and RAW files available locally for full-quality grading.
Result: A complete end-to-end shared media environment suitable for grading, compositing, and final delivery.
If using shipped drives instead of the cloud, replicate the same folder structure and depth—just without enabling media sync.
Strategy D — No Sync (metadata-only collaboration)
Your role (owner): Select “Do Not Sync Media.” You’ll only share the project metadata—the timelines, bins, and edits.
Collaborator’s role (editor or colorist): Work from a mirrored local or shipped drive containing the same folder tree. They’ll open the cloud project to access the timeline but use their drive for media playback.
Result: Perfect for air-gapped workflows or high-security environments where internet sync is impractical.
First Open: Save Location and Folder “Path Depth”
When your collaborator first opens the project and performs a Save As, they need to pay close attention to where they save it.
The saved project name should match your top-level project folder name exactly.
They must save it at the same folder depth, not inside the project folder, but at the same level as it.
In other words, when they select the save location, they should point to the directory that contains the main project folder, not create a new one inside it. Resolve may show a “reused folder” warning—that’s actually a good sign. It means the path depth matches perfectly. This is critical for Strategies C and D, especially when shipping drives. If the folder depth differs, even by one level, Resolve will not find your media, and half the clips will appear offline.

Final Reminders & HARD (L)EARNED Lessons
First open is critical: Don’t assume your collaborator will get it right the first time. Be on a call or screen share when they open the project and set up their sync preferences. One wrong selection here can cascade into days of relinking. There’s no shame in holding their hand through that first setup — it’s leadership.
Do not move folders or files once a project has started: Resolve doesn’t track media like a database; it relies on path consistency. Even moving a single clip from one folder to another breaks the link chain. If something needs to be reorganized, do it before you share the project, or after final delivery.
Avoid renaming anything inside
01_MEDIA: Folder and file names are part of the reference identity Resolve uses to match media. Change a name, lose the link. If something must be renamed for clarity, do it outside the project and re-ingest cleanly.Keep your proxies clean and current: If you regenerate proxies mid-project, make sure everyone deletes their previous ones before syncing again. Old proxy files can remain cached and cause mismatched color or timecode.
Never import external downloads directly from your desktop or downloads folder: Always drop new assets into the proper subfolder (
Audio,Images, orVideo) before adding them to the project. This ensures they sync into the right place and maintain the structural mirror.Don’t rely solely on Cloud backups: Export a
.drpto your00_PROJECTS/folder after every major milestone. Cloud libraries sync metadata but don’t protect you from version loss if corruption occurs.Agree on who finishes: If you’re proxy-only, the final online and export happen on your system with the full RAWs. Make sure collaborators know not to deliver from proxies unless explicitly instructed.
Use simple folder names and avoid special characters: Spaces, emojis, or slashes in folder or project names can break cross-platform links between Mac and Windows systems.
Test the pipeline on a small project first: Before your high-stakes client piece, run a quick trial — a one-minute cut — using the same folder, proxy, and sync process. It’s the fastest way to catch workflow friction before it counts.
In the end, cloud collaboration isn’t about technology, it’s about trust, clarity, and discipline. A shared folder tree is a shared language, and when everyone speaks it fluently, the technology disappears. Resolve 20 has made remote post-production genuinely viable, but only when led by someone who treats structure as sacred. If you control the media, set the rules, and guide your collaborators through that first open with care, you’ll discover the real advantage of cloud workflows: not convenience, but creative continuity…the ability for a team scattered across the world to move like a single editor.